How to Assemble a Sleep Number Bed (11 Steps)
Disclosure: We may get commissions for purchases made through links in this post.
When buying a Sleep Number bed, note that most of these bed types do not get delivered to your home fully assembled. Hence, you will need to know the correct way of placing the hardware and bed layers together – apart from researching the bed’s compatibility with your sleeping habits. Fortunately, putting your bed together is easy and takes less than an hour from start to finish, including the time spent in filling the air chambers.
Sleep Number bed assembly instructions consist of 11 steps covering how to assemble a Sleep Number bed frame and mattress, setting up the Firmness Control System, and adjusting sleeper settings to your preferences. Completing the process takes 40 minutes but could be less for a 360™ Smart Bed.
Below are the steps on how to assemble a Sleep Number bed:
- Assemble the base.
- Place the mattress cover over your base.
- Secure the corner lock mechanism in place.
- Place the foam walls and base pad.
- Install air chambers.
- Set up the Firmness Control System.
- Activate DualAir™ Technology.
- Add foam comfort layers.
- Verify border wrap positioning.
- Close the mattress cover top.
- Adjust sleeper settings and enjoy!
Despite the smart technology of Sleep Number beds, assembling one is way easier than it looks. So, there will be no need to worry if you cannot avail of Sleep Number’s Comfort Service℠ Home Delivery. This guide will go through how to get your little piece of heaven assembled in minutes.
How to Assemble a Sleep Number Bed
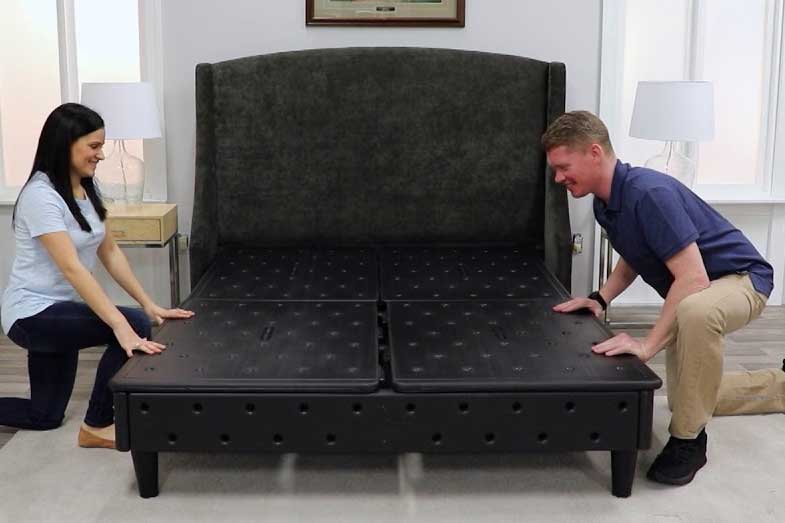
1. Assemble the base.
This first step entails assembling the modular base, side rails, and foot rails of your bed if you bought one of Sleep Number’s modular or FlexFit™ bases. Either option can work as a standalone or fit within your existing bed frame. If the latter is true, you can proceed without assembling the foot rails or legs. Having a box spring (that does not sag and is undamaged) eliminates the need to buy a modular base unless you are getting a smart bed.
Proper Bed Support
Manufacturer-provided bases conveniently come together with interlocking rails. So, if you do not want to be bothered with your old bed frame, then include this in your purchase. You just need a screwdriver to ensure the legs fit tightly. If you have a smart base like that of a Sleep Number 360™ Smart Bed, you will need to plug it in as well.
Sleepers with existing bed frames usually have slats or a Bunkie board between the frame and their mattress for additional support. If you are using any of these two, make sure it is correctly set. For slats (view on Amazon), you should have more than three spaced evenly, and their gaps should not be larger than 2 inches (some online resources suggest 4 inches). On the other hand, a Bunkie board should measure 1-3 inches in thickness and should perfectly fit the surface it rests on. Remember that if you already have slats, it will not be necessary to use a Bunkie board, and vice-versa.
Sleep Number Bed Assembly
A regular Sleep Number bed consists of easy-to-assemble rails, support beams, and deck panels. Each component is labeled with “A” or “B,” depending on which side they should be placed on. The pieces adjoin with relative ease and should click when put together. Secure them into place by using the pins included in the package.
For modular bases, install legs first before any cross support. Going straight for the beams will make it a bit challenging for you to install legs later. This step, however, is optional if you are using an existing bed frame. For a FlexFit™ base, make sure that you adjust all legs to the same height. For split bases, make sure to connect the base, headrails, and foot rails. Once completed, place the deck panels on top of the frame to create a sturdy platform for your mattress.
You will need to have Sleep-Number-specific mounting brackets if you have an existing headboard you want to attach to the base. Additionally, your base should not be sitting on the floor – you will need to have modular base legs to attach the brackets from the base to your headboard. Base legs will no longer be necessary if you have an elevated bed frame. As a final touch, cover the base with a coverlet (view on Amazon).
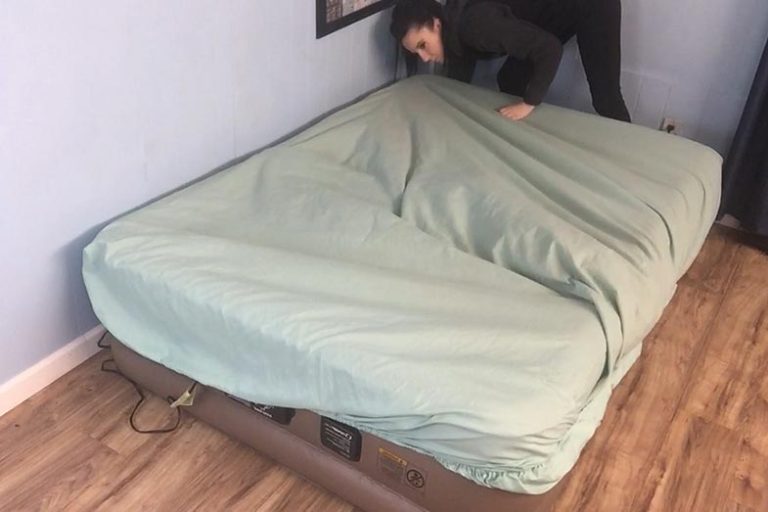
2. Place the mattress cover over your base.
Step #2 is where you begin assembling your mattress. Depending on whether your bed has a dual system or not, the bottom of your mattress casing may have one or two openings. These openings will need to be placed at the head of your bed so that you can set up your air system properly. If you have two of them, make sure to open the bottom zipper, as this is where all the foam, sidewalls, base pad, and air chambers will go.
3. Secure the corner lock mechanism in place.
While queen-sized (and larger) beds have notched side walls, most double beds have a corner locking system. Simply put, these are adjacent mating side panels and end panels placed on the bottom of the mattress cover that forms its corners and keeps its walls stable. When doing a Sleep Number bed setup for a double bed, it is important to secure these in place before you can fit the foam and air chambers inside the mattress.
4. Place the foam walls and base pad.
With your mattress top open, begin building the structure of your bed. First, make sure the notches or corner lock mechanism located at the ends of each wall face inwards, as they help give shape to and complete the rest of the wall support. Next, start with placing the long foam sidewalls along each side of the bed, followed by the end walls. Once the side and end walls are secured in place, lay the base pad flat in the middle part of the mattress.
To prevent any foam from folding, shake the base pad out before laying it into the bottom of the mattress cover. If it is dual-sided – a textured side and a smooth side – then make sure the smooth side faces downwards and the smooth side upwards. Also, do not forget to place the air chambers on top later on, with both hose connections facing the head of the bed. With these three parts placed properly, you will now have full access to the inside of the case, which will allow you to begin layering the bed and installing air technology.
5. Install air chambers.
Installing air chambers come next – they should be laid over the base pad so that the hose connectors face the bed’s head and lie on the bottom when inflated. After laying the air chambers flat, you can set up the air chambers for your bed.
6. Set up the Firmness Control System.
Before setting up the Firmness Control™ System and connecting it to the air chambers, ensure that it is located correctly inside or outside your bed base. For elevated bases or bases with legs, it should sit inside the first section of the base. For bases sitting on the floor, the system should be outside the base at the head of your bed. As a precautionary measure, you should plug the Firmness Control™ System into a surge protector – this is to guarantee that your air control unit and electronics are protected from damage from a power surge or a lightning strike.
TIP: The manufacturer’s recommendation is to use a surge protector (view on Amazon) listed to UL® 1449 – with a clamping voltage of 330 volts and a joule rating of 700 or higher. Similarly, note that the Sleep Number bed 20-year Limited Warranty does not cover damage to the Firmness Control™ System caused by a power surge, regardless of the source.
7. Activate DualAir™ Technology.
Once you have correctly set the Firmness Control™ System in place, begin connecting the hoses. Start with the left hose (typically marked with a white band) by passing it through the opening on the mattress cover’s bottom. Then, connect the hose to the left air chamber until you hear it click, confirming it has created a seal. Repeat, but on the right side of the mattress. Like the left hose, the right hose is easy to spot due to its blue band mark. You may need to pull or feed part of the hose through the opening as you go about this step.
Plug the Firmness Control™ System into a working electrical outlet. After which, turn the system on and use your remote to inflate the air chambers. But before doing so, make sure your remote has batteries (two AA batteries specifically for Sleep Number remotes), you have downloaded the app to your smartphone, and you have completed following the online app setup instructions. If you have done all these, you can turn on the system and fill both air chambers to 100 by pressing and holding the “firmer” button to begin inflation.
It is always best to start with your system fully inflated, as this allows you to set the rest of the bed layers up in the evening before setting personal comfort levels later. For dual-system beds, note that one side or air chamber inflates at a time. Hence, you will need to exercise some patience. Additionally, you will need to fit the center foam wall between your fully-inflated chambers and zip them together to avoid getting a gap between the two. This is an optional last step if you are using a single-chamber bed.
8. Add foam comfort layers.
With the base, mattress, and air chamber parts of the Sleep Number bed setup completed, you can now place the foam layers into the mattress casing. Like the base pad, make sure the layers are settled evenly, with the smooth side facing down and the textured side facing up. If your Sleep Number bed has a dual-layer design, you can place either comfort layer on top, depending on your preference. Place the duvet or mattress cover (view on Amazon) or pillow top over the inflated air chambers, lining up the zippers in the process. Then, add the border wrap on top. Zip the two pieces shut by connecting the zippers that are closest to the floor.
TIP: Before placing the comfort layer or pad in the duvet or mattress cover, open it and let it expand for 20 minutes.
9. Verify border wrap positioning.
The foam border wrap should now extend over the entirety of the foam walls and comfort layers. Confirming the border wrap extends all the way over your comfort pad ensures that your Sleep Number bed complies with federal and state flammability requirements. It also keeps your mattress under warranty. The border wrap should pull over the mattress edges, laying upon the top in a snug fit.
10. Close the mattress cover top.
With the border wrap positioned correctly and your mattress setup done, proceed to zip the top of your duvet or mattress cover. To close it properly, make sure the zipper pull is at the head of the bed and completely inserted into the zipper box.
This video by Gears & Gadgets demonstrates all the steps for assembling a Sleep Number P5 bed – from setting up the modular base to zipping up the mattress cover (applies to Classic™, Performance™, and Innovation™ bed types).
11. Adjust sleeper settings and enjoy!
Now that you have completed how to assemble a Sleep Number bed, it is time to adjust your sleeper settings to your preference. Lay on your smart bed and use the remote to slowly decrease the Sleep Number or firmness setting until you reach your desired comfort level. Have your partner do the same if you have a dual-system. Once done, all that is left for you to do is enjoy a long nap or look forward to a heavenly night’s sleep!
Despite your Sleep Number bed’s smart technology, you will need to give yourself and the bed time before you can determine your ideal sleeper setting. When using the bed for the first time, the built-in sensors begin to track your sleep movements, respiration, and heart rate. However, it takes about three to four nights on a specific sleeper setting before you can truly say that your body has become accustomed to your new bed and that you have found the perfect comfort level.
Assembly is easier for Sleep Number 360™ Smart Beds as the mattress – split or standard – is delivered in one piece. There will be no need to assemble it manually. All you have to do is attach the magnetic parts of the mattress to the top of the FlexiFit base once the latter is completely set up. This Sleep Number video shows you just how easy it is to assemble a Sleep Number 360® Smart FlexFit™ bed.
Conclusion – Sleep Number Bed Assembly
To recap, here are the easy-to-follow steps on how to assemble Sleep Number beds:
- Assemble the base.
- Place the mattress cover over your base.
- Secure the corner lock mechanism in place.
- Place the foam walls and base pad.
- Install air chambers.
- Set up the Firmness Control System.
- Activate DualAir™ Technology.
- Add foam comfort layers.
- Verify border wrap positioning.
- Close the mattress cover top.
- Adjust sleeper settings and enjoy!
On top of knowing how to assemble Sleep Number beds, it is equally significant that you have the right space for your impending delivery. Your bed space should be spacious enough for you to assemble parts and move freely in. Otherwise, you may need to assemble your Sleep Number bed elsewhere and move it to your bedroom, which could be a pain depending on the layout of your home. Ultimately, having a plan in place before your dream bed arrives is always a great way to ensure you have a hassle-free experience setting it up.